

Create a scroll-driven 3D animation
A scroll-driven 3D animation ties the playback position of a named animation track directly to how far a visitor has scrolled down the page. As the user reads through your content, the 3D scene advances in sync — revealing a product from every angle, walking through an architectural space, or guiding attention to specific parts of a model. This technique is widely used in product landing pages, interactive storytelling, and technical explainers. This guide shows you how to set it up end-to-end in Edro 3D using the Sync with scroll animation mode.
Before you start
Section titled “Before you start”- Your project must already be created and your 3D scene uploaded and processed. If you have not done that yet, follow Publish your first 3D scene first.
- Your 3D scene file must contain at least one named animation track. Edro 3D only exposes animations that have a non-empty name in the source file. If no animations appear in the Animations tab, check your 3D authoring tool and make sure the action or clip has a name before exporting.
Step-by-step instructions
Section titled “Step-by-step instructions”-
Set the camera interaction mode to Fixed camera
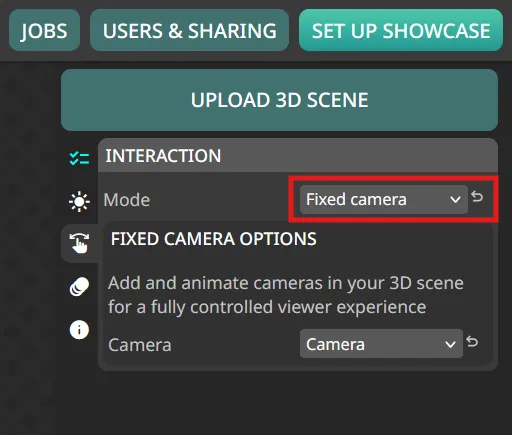
Section titled “Set the camera interaction mode to Fixed camera”Open the Interaction tab in the editor sidebar. Set the Mode to Fixed camera.
A fixed camera prevents visitors from orbiting or walking through the scene. Because the scroll position controls the animation, removing free navigation keeps the viewing experience predictable and focused on the story you are telling.
-
Open the Animations tab and locate your animation
Section titled “Open the Animations tab and locate your animation”Open the Animations tab in the editor sidebar. You will see a list of all named animation tracks found in your scene file. Each entry shows the animation name and its total duration in seconds.
-
Set the animation Mode to “Sync with scroll”
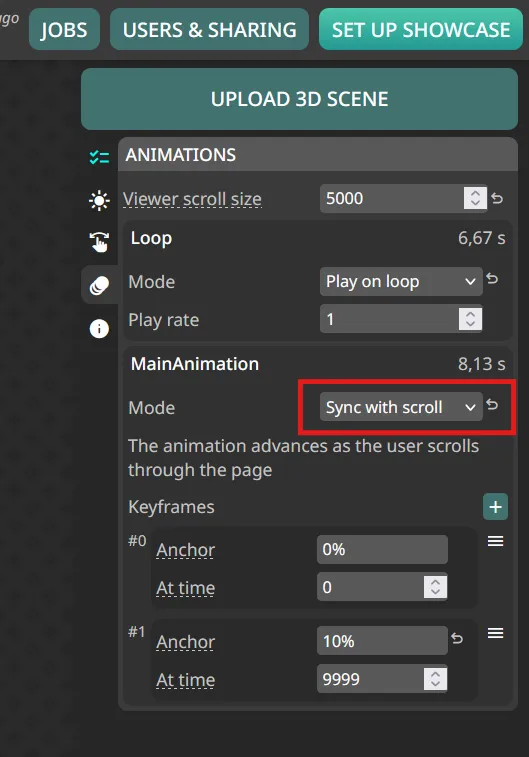
Section titled “Set the animation Mode to “Sync with scroll””Find the animation you want to drive with scroll. Open its Mode dropdown and select Sync with scroll.
The animation controls expand to show a Keyframes list. This is where you map scroll positions on the page to specific points in the animation timeline.
-
Customize keyframes
Section titled “Customize keyframes”Each keyframe connects a scroll position (Anchor) to a point in the animation (At time). The animation interpolates smoothly between keyframes as the visitor scrolls.
By default, two keyframes are created for you — one at the start of the animation and one at the end, assigned to the beginning and end of the scroll range, respectively.
You can refine the experience by adding intermediate keyframes, through the + button or Duplicate menu option. For example, to pause the animation while the visitor reads a mid-page section, add two keyframes with the same At time value but different Anchor values — the animation will hold at that position across the scroll range between them.
Anchoring to page elements — instead of pixel values or percentages, you can enter a CSS selector (e.g.
#features-section) as the Anchor. The keyframe activates at the scroll position of the matching element on the host page. This is the most reliable way to keep the animation in sync with specific sections of your content, since it adapts automatically to changes in page layout. -
Configure the Viewer scroll size (for the hosted showcase page)
Section titled “Configure the Viewer scroll size (for the hosted showcase page)”At the top of the Animations tab, a Viewer scroll size field appears whenever at least one animation is set to Sync with scroll. This controls how many pixels of scrolling the hosted Edro 3D showcase page provides before the page ends.
A larger value spreads the animation over a longer scroll distance, giving visitors more time to absorb each stage. A smaller value compresses the animation into a shorter scroll. Adjust it until the pacing feels right when you preview the showcase directly.
-
(Recommended) Add a looping animation to keep the scene alive
Section titled “(Recommended) Add a looping animation to keep the scene alive”A scroll-driven animation only advances when the visitor is actively scrolling. When the page is still, the scene freezes — which can make the experience feel inert, especially on first load before the visitor has scrolled at all.
To counter this, add a second animation track set to Play on loop. This loop runs continuously in the background, independent of scroll, so the scene always has some subtle motion — a slow rotation, a breathing cloth, a gentle camera drift, or any idle movement that suits your model.
In the Animations tab, find the animation you want to loop and set its Mode to Play on loop. Adjust the Play rate if the default speed feels too fast or too slow.
If your scene file only has one animation track, consider exporting a second, shorter clip from your 3D authoring tool dedicated to the idle loop — for example, a slow 360° rotation or a gentle oscillation — and re-uploading the file.
-
Deploy the changes
Section titled “Deploy the changes”Once the animation is configured, open the Set up showcase dialog and click Deploy. Wait a few seconds for the new version to go live.
Open the showcase URL to verify the animation responds correctly to scrolling before embedding it anywhere.
-
Embed with fixed positioning
Section titled “Embed with fixed positioning”When embedding a scroll-driven showcase in a web page, the
<iframe>should use fixed positioning so the 3D viewer stays in view while the visitor scrolls through the surrounding content.Open the Set up showcase dialog, go to the Embed section, and set Position to
fixed. Configure the offset fields to place the viewer where you want it on the screen (for example,top: 0,right: 0).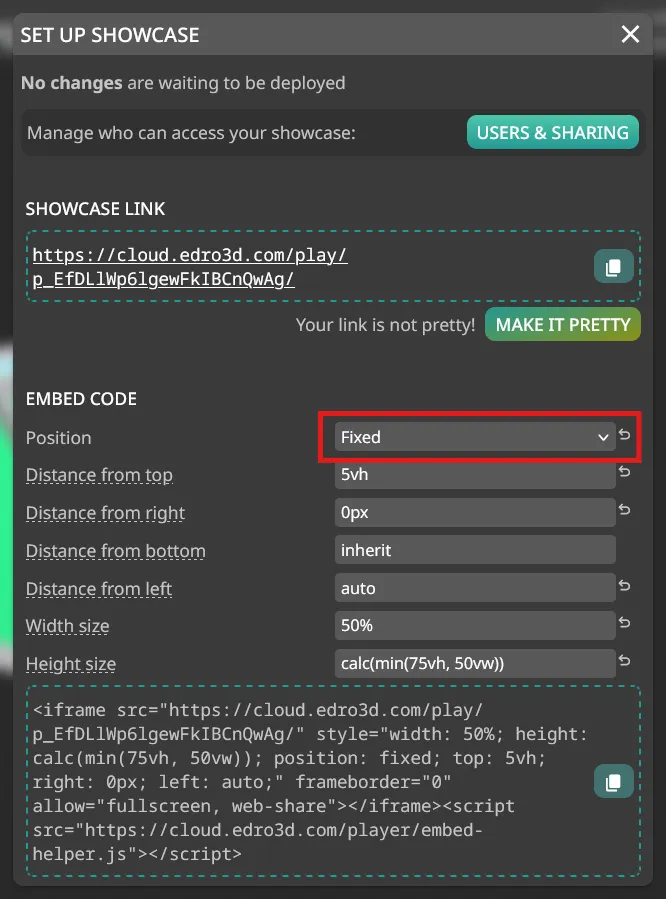
Copy the generated embed code and paste it into your page’s HTML, it should look something like this:
<iframesrc="https://cloud.edro3d.com/play/YOUR_PROJECT_ID"style="position: fixed; top: 0; right: 0; width: 50%; height: 100%;"frameborder="0"allow="fullscreen, web-share"></iframe><script src="https://cloud.edro3d.com/player/embed-helper.js"></script>The
<script>tag immediately after the<iframe>loads the embed helper. This script is what connects the host page’s scroll position to the animation inside the iframe. Without the embed helper, the animation will not respond to scroll when embedded.
Troubleshooting
Section titled “Troubleshooting”The animation does not respond to scroll when embedded.
The embed helper script is missing or is not placed immediately after the <iframe> tag. Add <script src="https://cloud.edro3d.com/player/embed-helper.js"></script> directly after the closing </iframe> tag.
Some CMS or site builders require a specific way to add custom scripts — check your platform’s documentation for how to include external JavaScript in your page.
The animation plays correctly on the hosted page but not in the embed.
The Viewer scroll size setting only controls the hosted page. When embedded, scroll distance is driven by the host page content. Adjust your keyframe anchors to match the layout of the host page — using CSS selector anchors (e.g. #section-id) is the most reliable approach.
No animations appear in the Animations tab. Your scene file does not contain named animation tracks. Open the file in your 3D authoring tool, name the animation actions or clips, re-export, and re-upload.
The 3D viewer scrolls off screen as the user scrolls down.
The <iframe> is using static or relative positioning. Set position: fixed so the viewer stays in the viewport while the surrounding page content scrolls beneath it.
The animation jumps instead of interpolating smoothly between keyframes. This usually means two keyframes have the same anchor value. Each keyframe must have a unique anchor. Check for duplicate entries and remove them.